How to make a boat cover frame for winter
 Rachel Davis
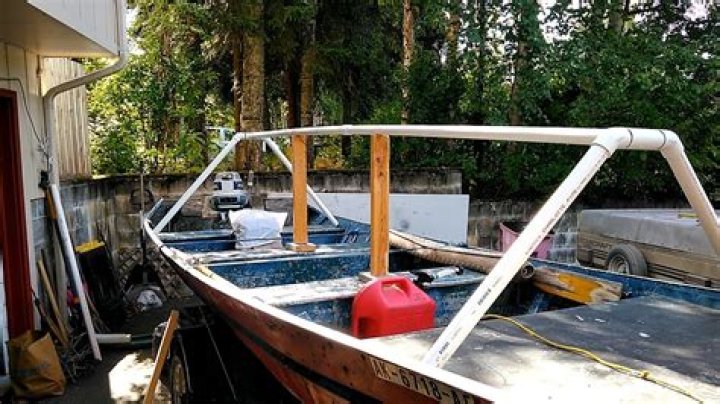
An old skiff or boat that’s been put into storage for the winter is likely to be covered by an old tarp.
Silky Terrier Dog Breed Playing Aro... Silky Terrier Dog Breed Playing AroundIt doesn’t take long before this makeshift arrangement falls apart, and you’ll need a good cover frame to spring back to life the next season.
If you don’t have one already or can’t find it, you can make one.
Here’s an easy way to do that.
Materials needed:
(2) pieces of pressure-treated wood 12′ long by 2″ x 4″ (you could also use untreated wood if you wish).
(1) piece of plywood 1/4″ thick by 8′ long and 4′ wide.
Tools needed: Saw, drill with a large drill bit, hammer or mallet, paintbrush for coating lumber with primer, or your favorite exterior house paint. Screwdriver. Hammer Screws between 1-1/4″ and 2-1/2″ long for fastening together the frame sections as illustrated below. 20 screws will do the job.
Assembly:
Locate a suitable location to stretch the plywood. In my case, it is against an outside wall of my home under one of the eves overhang about 6′ from the ground.
It was easy enough for me to build a simple stand that I could sit on a two-step step ladder and work off of, but you could also prop up your plywood sheet onto something sturdy at waist height if you have no place to do this indoors.
Layout your 2 x 4’s side by side with 1 x 4’s placed crossways between them for bracing as illustrated below. You don’t really need this center brace, but I’m finding it adds enough stability to make standing on the ground easier to do.
Drill pilot holes through where the nails will go at each of the lumber connection points.
Now flip over one of these sections and measure in 6″ from either end and mark both locations.
Then drill your pilot holes here also, but offset them so that they are center to center with what you just drilled on the top of this 2 x 4 section. Next drill a 1 3/4 ” hole right through the cross brace member for inserting your bolts or screws into when attaching it to where you’ll be stretching your plywood sheet across.
Repeat with the other 2 x 4 section.
Now place your plywood sheet onto the top of these 2 x 4 sections with the cross braces in between them. Remember to insert your bolts or screws through the hole you drilled into both ends of each cross brace member. I used stainless steel bolts that are 1-1/4″ long. These are inserted from inside out through this cross brace for attaching my tarp cover sheets to hold them down tightly during strong winds. Pry up one end of your plywood and start positioning it across these two 2 x 4’s, but leave about an inch at each end loose before tightening down the bolts or screws completely. Each bolt is hand tightened using a screwdriver bit. Make sure to space them out evenly across both sides using a ruler or tape measure.
Now place the other 2 x 4 section of framing on top of that and insert your bolts from underneath. Tighten down loosely each bolt with a screwdriver bit before you move over to the next location also tightening them down as you go along one at a time spaced out evenly along both edges of this plywood sheet.
Once all four corners have been tightened down, you can now pull up on the loose ends of your plywood sheet and tighten down each bolt securely for a snug fit. I use two stainless steel bolts 1-1/4″ long as illustrated below. (I put stainless steel as these will not rust when left out in the rain.)
This is what it will look like when finished with both end pieces secured tightly at all four corners. You can see where I’ve pushed in some tabs to keep my tarp cover sheets in place during strong winds. They are also held down by bungee cords wrapped around them to keep them tight if needed when not expecting high wind gusts.