How To Change Cvt Belt On Can Am Commander
 Sarah Silva
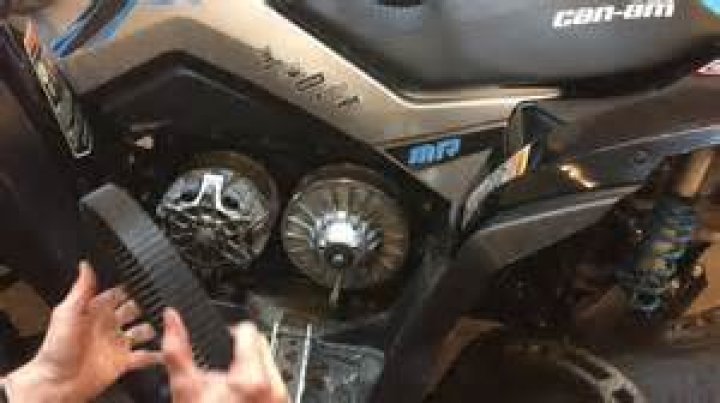
It’s more likely than an ATV’s continuous variable transmission (CVT) belt breaking in comparison with UTVs.The quads are smaller in weight and do not place as much strain on the belt as a UTV will. We did get a belt to fail on our new 2019 Can-Am Renegade X xc 1000R because it was excessively hot during some intense riding. It’s an extremely rare event however, you must consider changing the CVT belt in your ATV in the course of time. They will wear out, which implies lower reliability, less slippage, and a reduction in power. This How-To will teach you how to replace this belt in the Renegade. It’s not that complicated, but you’ll require the proper tools to complete the task.
Silky Terrier Dog Breed Playing Aro... Silky Terrier Dog Breed Playing AroundCHANGE A CAN-AM RENEGADE CVT BELT
-3/8-inch ratchet
-10mm socket
-8mm socket
6-inch long 3/8-extension
3-inch long 3/8-inch extension
10mm combo wrench
Be aware that you will have to visit the local hardware store and get an 8mmx1.25 bolt which is at least 50mm long in order to get your CVT’s second clutch to be separated enough to take off the belt of CVT. There are a few bolt heads that could differ in size. Ours was 13mm. The bolts that are on the bottom of the cover are hard to reach and can take some time to unscrew when you keep the footwell components left on. We use a three-speed electric impact wrench to remove screws and nuts. Always thread bolts, screws, and nuts by hand prior to using an impact wrench to tighten hardware.
We recommend that you do not utilize the impact wrench to perform any tightening procedure as it is a great way to strip threads and break pieces. The choice is entire to you! Let’s get started. This is where we begin. The CVT cover in this picture as well as the peg and footwell. It is the easiest way to remove the CVT case and take it off by removing these components to get it out of the way.
Begin by taking the bolts and nuts from the footwells which join with the plastics on the top. It is recommended to use a T-30 Torx and a 10mm socket is used. We think that on certain devices, clips made of plastic would be used to hold the plastics together, however, the model we have was found to us with bolts and nuts. The footwell’s rear must also be removed from the plastic on the rear. It is recommended to employ an impact toolset on a low setting for the removal of pieces. It is recommended to employ hand tools first if the equipment won’t break quickly.